How To Contribute to Open-Source Projects
Git and GitHub guide for opensource project contributions
Table of contents
- Prerequisite
- Things to look up
- How to Fork a Project
- Clone a Repository
- Step #1 - Navigate to the forked repo
- Step #2 - Clone the Project Locally
- Step #3 - Check that your fork is the "origin" remote
- Step #4 - Add the project repository as an "upstream" remote
- Step #5 - Pull the latest changes from upstream to your local repository
- Step #6 - Create a new branch
- Step #7 - Make changes in your local repository
- Step #8- Commit your changes
- Step #9 - Push your changes to your fork
- Step #9 - Create the pull request
- Step #10 - Review the pull request
- Step #11 - Discuss the pull request
- Step #12 - Delete your branch from fork
- Step #13 - Delete your branch from the local repository
- Step #14 - Synchronize your fork with the project repository
- Congratulations!
- BONUS
- Parting Thoughts
My introduction to the world of open source began with a YouTube video promoting Hacktoberfest in 2018. Little did I know that my initial foray into this realm would involve a seemingly small task: correcting a typo and adding a few missing semicolons to a codebase. Some might scoff and say, "That doesn't count as an open-source contribution; it's more like a minor fix!"
I admit, I once held a similar perspective. However, as time has passed, my outlook has evolved. Starting my journey in open source was indeed intimidating, but I persevered. Reflecting on that inaugural contribution, I now realize it was an invaluable learning experience.
As a newcomer with minimal knowledge of open-source practices, I acquired essential skills. I learned how to effectively communicate with project maintainers, navigate the intricacies of Git and GitHub, and craft a well-structured pull request. It was a steep learning curve, to say the least.
Motivated by my journey, I've created this guide to assist others in embarking on their open-source adventures. Within these pages, I'll walk you through the fundamental Git and GitHub processes essential for contributing to open-source projects. You'll discover how to keep your forked and local repositories in sync with the source and how to adeptly handle merge conflicts when they arise.
Without further delay, let's dive in and begin your open-source journey!
Prerequisite
you will only need a GitHub account and a Code Editor like VsCode.
Things to look up
When you are interested in contributing the first thing you should be looking at is whether the project is open source or not.
Well, all the projects on GitHub are not open source.
License
The first thing you should always verify is the project's license status. On GitHub, a project isn't considered open source unless it has a valid license.
In many legal jurisdictions, a project lacking a license is automatically protected under "All Rights Reserved" by its owner. This implies that no one is permitted to utilize, modify, or share any part of the project without the owner's explicit consent. Ignoring this can lead to legal consequences, including potential lawsuits.

To locate the project's license, check for a file named LICENSE, typically found in the "About" section of the repository.
Readme File
The README file is a fundamental document in open-source projects, It serves as the initial point of reference for potential contributors. It contains vital information about the project's goals, scope, installation procedures, usage guidelines, contribution instructions, code of conduct, contact details, dependencies, and licensing terms. Essentially, it's a concise yet comprehensive guide that equips contributors like you with the essential knowledge they need to engage effectively with the project, ensuring their contributions align with project objectives, adhere to best practices, and foster a productive collaboration within the project's community.
The Contribution Guide
Open-source projects typically become contribution-ready when they provide a contribution guide. This comprehensive resource covers everything you need to understand about participating in the project, spanning from initiating an issue to crafting a pull request, and from adhering to the code of conduct to adopting the expected communication style. It's important to note that the procedures and prerequisites for contributing can vary between open-source projects. Therefore, it's essential to thoroughly review and adhere to the project-specific guide when contributing. Usually, you'll locate a section about the contribution guide within the README. However, if you can't find it there, be sure to search for a file named CONTRIBUTING.md or something similar, as it often contains the necessary guidance.
Topics and Labels
GitHub topics and labels play essential roles in helping contributors navigate and engage with open-source projects effectively. try hitting a Google search "GitHub topic python"
GitHub Topics: Topics are descriptive keywords or phrases that project maintainers can assign to their repositories. They provide a high-level overview of the project's focus and functionality, making it easier for contributors to discover projects aligned with their interests and expertise. For example, a project related to web development might have topics like "web development," "JavaScript," and "frontend." Contributors can use these topics to filter and find projects that match their skill set or areas of interest.
GitHub Labels: Labels are used to categorize and manage issues and pull requests within a repository. They help maintainers and contributors quickly identify the status, type, and priority of individual items. For instance, labels like "bug," "enhancement," or "documentation" classify issues based on their nature. Labels such as "help wanted" or "good first issue" are particularly beneficial for newcomers, as they indicate tasks suitable for contributors who are just starting with the project.
visit here and explore.
In summary, GitHub topics and labels are valuable tools that enhance the discoverability and organization of open-source projects. They help contributors find projects of interest, understand the nature of issues or pull requests, and identify opportunities, especially during events like Hacktoberfest, fostering a more inclusive and collaborative open-source community.
Hactoberfest Topic and Label
Hacktoberfest is a yearly event in October sponsored by DigitalOcean to support and embrace open-source involvement.
To participate in this event, you should check whether a project is involved in Hacktoberfest before contributing.
A project participating in the event should have a hacktoberfest topic that you can find tagged in the "About" section of the repository's main page.

The project should also have issues that are labeled hacktoberfest. Without this label, the issue is not part of the event, although the repository may have other hacktoberfest topics.

Now that you have a basic overview of the project you want to contribute to, let's look into the steps required to get going with the journey.
How to Fork a Project
You're all set to start contributing to a repository of your choosing. Your first step should be to create a fork of the repository.
"Forking" essentially means making a duplicate copy of a repository within your own GitHub account. This is a necessary step because most open-source project maintainers don't grant contributors direct access to make changes to their original repositories.
To distinguish between the two repositories, we'll use specific terms: your forked repository will be referred to as the "origin repository", while the original repository will be termed the "upstream repository". I'll use these names moving forward.
To initiate the forking process, head to the main page of the repository on GitHub, and click the The fork button is located at the top right.

It will redirect you to the "Create a new fork" form. You can leave the inputs as it is. Then, click the green "Create fork" button at the bottom.

This will create a copy of the repository in your GitHub account.
Clone a Repository
After forking the repository, the next thing to do is to clone it.
Cloning a repo means creating a copy of a repository in your local environment. You should clone your forked repository when contributing to an open-source project.
Here are the steps to follow:
Step #1 - Navigate to the forked repo
Navigate to your forked repository with these steps:
Click your avatar on the top right.
Click
Your repositoriesare on the dropdown menu.Click the repository that you want to clone to open it.
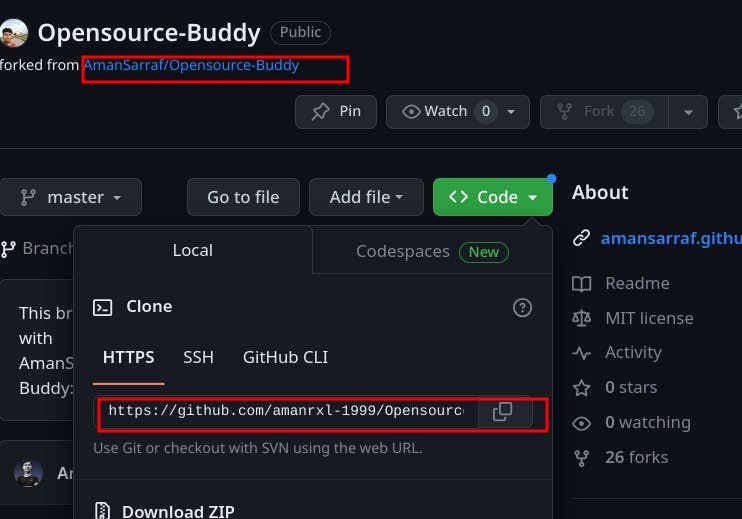
Then click on the green <> Code button. Copy the HTTPS URL by clicking the copy icon.
To ensure that you are cloning the forked repository, you should see your GitHub username in the link.
For example:
https://github.com/<github-username>/<repository-name>.git
that is:

click the avatar and go to the repository :

now you will be seeing all the repositories including the forked one

open the repository and you will find a green clone button there.
Step #2 - Clone the Project Locally
first of all, install git on your local machine here
In your terminal or command prompt, run the git clone command along with the URL that you copied :
git clone <copied-url>

after the project gets cloned, navigate to the project's directory
cd <project-name>

Step #3 - Check that your fork is the "origin" remote
You are going to be synchronizing your local repository with both the project repository (on GitHub) and your fork (also on GitHub). The URLs that point to these repositories are called "remotes". More specifically, the project repository is called the "upstream" remote, and your fork is called the "origin" remote.
When you cloned your fork, that should have automatically set your fork as the "origin" remote. Use git remote -v to show your current remotes. You should see the URL of your fork (which you copied in Step 1 ) next to the word "origin".

If you don't see an "origin" remote, you can add it using: git remote add origin URL_OF_FORK.
Step #4 - Add the project repository as an "upstream" remote
Go to your fork on GitHub, and click the "forked from" link to return to the project repository:

While in the project repository, click the green Clone or download button and then copy the HTTPS URL:

Add the project repository as the "upstream" remote using: git remote add upstream URL_OF_PROJECT.
For example, I used git remote add upstream https://github.com/AmanSarraf/Opensource-buddy.git.
Use git remote -v to check that you now have two remotes: an origin that points to your fork, and an upstream that points to the project repository

The below diagram summarizes the steps till now

Step #5 - Pull the latest changes from upstream to your local repository
Before you commence any modifications to your local files, it's considered a best practice to ensure synchronization between your local repository and the project's repository. You can achieve this by employing the command git pull upstream master to "pull" any alterations from the "master" branch of the "upstream" repository into your local copy. (If the project repository employs "main" as its default branch instead of "master," then you would employ git pull upstream main.)
If you've recently forked and cloned the project repository, it's highly improbable that any changes have occurred within this short period. In such cases, Git will notify you that your local repository is "already up to date." However, if any changes have been made, Git will seamlessly integrate them into your local repository.
Step #6 - Create a new branch
Instead of directly making alterations to the project's "master" branch, it's a recommended practice to establish your own branch. This approach creates a segregated workspace for your tasks, keeping them isolated from the master branch.
To create and instantly switch to a new branch, employ the command git checkout -b BRANCH_NAME. Ensure that the branch name succinctly describes the nature of your work and avoids including any spaces. For instance, I utilized git checkout -b doc-fixes to signify that I was making minor documentation adjustments.
To view your locally available branches, employ the command git branch. You should observe your newly created branch alongside "master," with an asterisk denoting that it's "checked out," signifying that you are actively working within it.
git checkout -b doc-fixes
Step #7 - Make changes in your local repository
Use a text editor or IDE to make the changes you planned to the files in your local repository. Because you checked out a branch in the previous step, any edits you make will only affect that branch.
Step #8- Commit your changes
After you make a set of changes, use git add -A to stage your changes and git commit -m "DESCRIPTION OF CHANGES" to commit them.
For example, I used git commit -m "fix typos in set_config docstring" for one of my commits.
If you are making multiple sets of changes, it's a good practice to make a commit after each set.
Step #9 - Push your changes to your fork
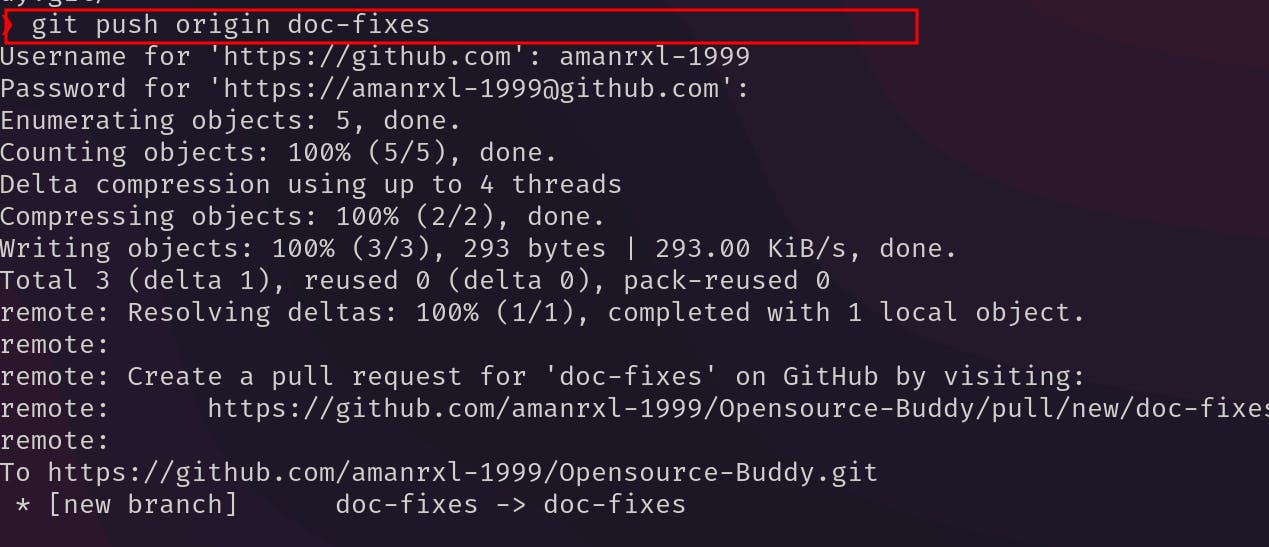
When you are done making all of your changes, upload these changes to your fork using git push origin BRANCH_NAME. This "pushes" your changes to the "BRANCH_NAME" branch of the "origin" (which is your fork on GitHub).
For example, I used git push origin doc-fixes.
It will ask for the Username for 'https://github.com':
you simply need to enter your GitHub username
After that, the prompt will ask you for a Password for 'https://<github-username>@github.com':
you need to enter the personal Access token/password for your GitHub account, check here to learn how to generate one.
Step #9 - Create the pull request
When opening a "pull request", you are making a "request" that the project repository "pull" changes from your fork. You will see that the project repository is listed as the "base repository", and your fork is listed as the "head repository", on your fork you will see a button to create a pull request
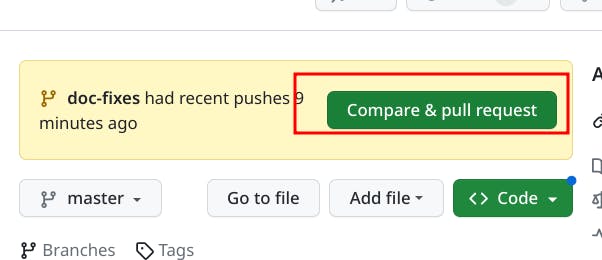
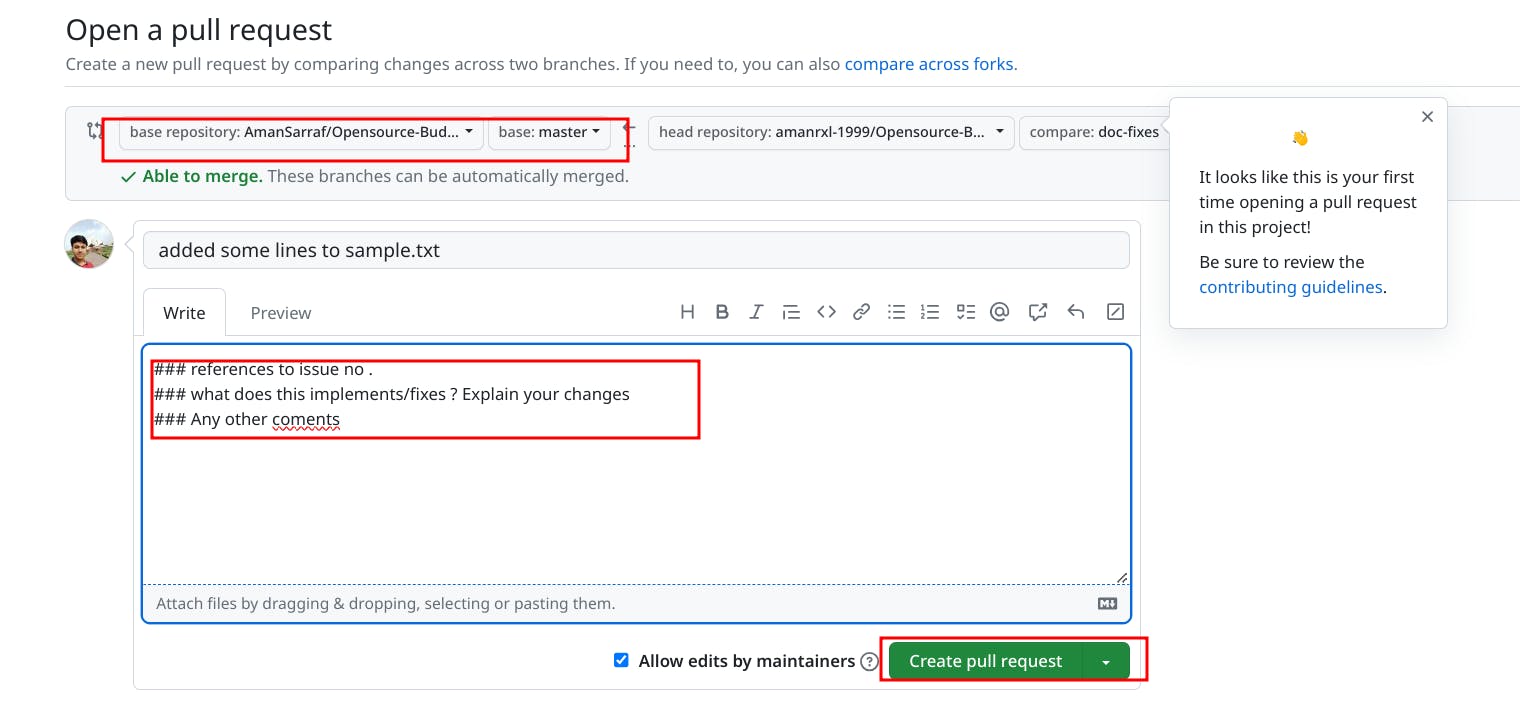
Before you proceed with your pull request, it's crucial to provide a clear description of the changes you've implemented, rather than leaving project maintainers to decipher them independently. Begin by crafting an informative title for your pull request and then elaborate further within the body of the request. If there are pertinent GitHub issues linked to your changes, be sure to reference them by their issue numbers. Markdown formatting is supported in the body, and you can preview how it will appear by clicking the Preview tab.
On the right-hand side, you might find a link to the project's Contributing guidelines. While these are particularly pertinent for substantial code contributions (beyond minor fixes like typos), it's still worthwhile to peruse them at this juncture.
Beneath the pull request form, you'll encounter a list detailing the commits you've made in your branch, as well as the "diffs" displaying the file alterations.
Once you've reviewed everything and everything appears in order, click the green "Create pull request" button to initiate the process

.
Step #10 - Review the pull request
You've successfully generated a pull request, and it's stored within the project's repository, not within your fork of the repository. It's advisable to carefully review your submission by reading through your written content and navigating to the Commits tab and the Files Changed tab to assess the content of your pull request:
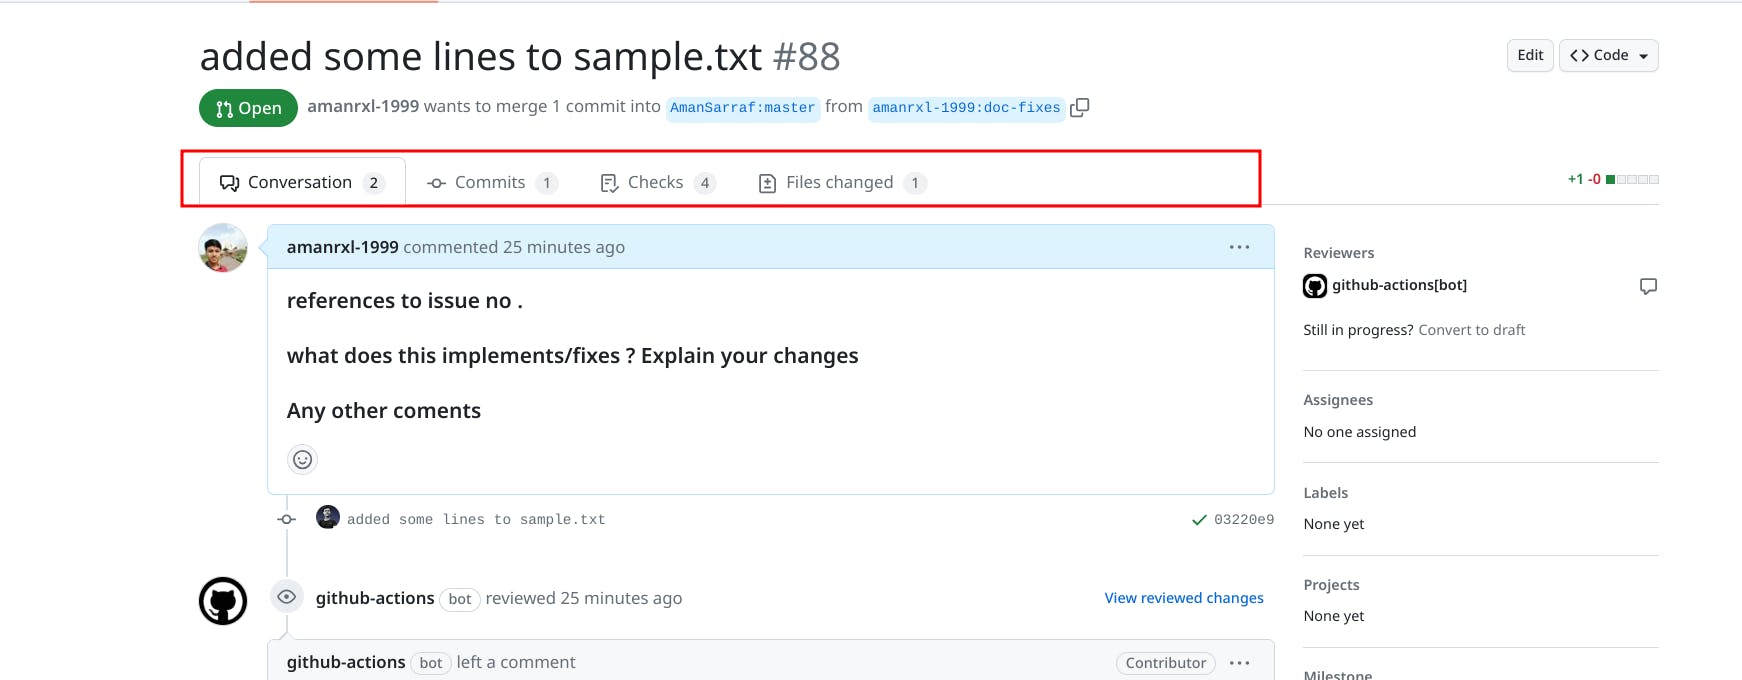
If you realize that you left out some important details, you can click the 3 dots in the upper right corner to edit your pull request description.
Step #11 - Discuss the pull request
If there are questions or discussion about your pull request from the project maintainers, you can add to the conversation using the comment box at the bottom of the pull request:

Step #12 - Delete your branch from fork
If the project maintainers accept your pull request (congratulations!), they will merge your proposed changes into the project's master branch and close your pull request:
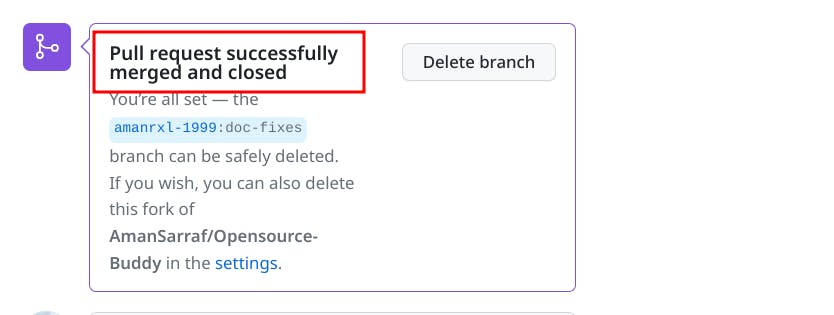
You will be given the option to delete your branch from your fork since it's no longer of any use:

click the Delete branch.
Step #13 - Delete your branch from the local repository
You should also delete the branch you created from your local repository so that you don't accidentally start working on it the next time you want to contribute to this project.
First, switch to the master branch: git checkout master.
Then, delete the branch you created: git branch -D BRANCH_NAME. For example, I used git branch -D doc-fixes.

Step #14 - Synchronize your fork with the project repository
At this point, your fork is out of sync with the project repository's master branch.
To get it back in sync, you should first use Git to pull the latest changes from "upstream" (the project repository) into your local repository: git pull upstream master.
Then, push those changes from your local repository to the "origin" (your fork): git push origin master.
If you return to your fork on GitHub, you will see that the master branch is "even" with the project repository's master branch
Congratulations!
Congratulations on making your first open-source contribution! 🎉
Contributing to open-source projects can be daunting and make you feel intimidated at the beginning. But like other skills, with continuous practice, you will become better.
BONUS
How to quickly find Open-Source Projects to contribute
Now then you have a pretty idea about the steps involved in making an open-source contribution, here I am listing some platforms and ways to find open-source projects for beginners.
Up For Grab: Up For Grabs curates a collection of open-source projects that offer designated tasks for newcomers.
You can narrow down the selection by using labels and tags, then explore the projects that catch your interest.
CodeTriage: CodeTriage simplifies your open-source contributions by sending a curated selection of open issues straight to your email inbox.
Once you've registered on CodeTriage, you can choose the repositories you'd like to assist with, and they will regularly dispatch relevant issues to you. To date, they've facilitated 63,488 developers in contributing to 6,767 open-source projects.
First Contributions: First Contributions streamlines your initial open-source contribution process, allowing you to make your first contribution in just five minutes. To begin, you need to clone their repository to your local machine, add your name to their "Contributors. md" file, and then push the changes to GitHub. Once you've completed these steps, you can explore their comprehensive project list and select those that align with your skills and interests.
Aviyel: Aviyel is a community-centric monetization platform designed to support open-source projects. They collaborate with open-source creators to cultivate and reward engaged communities, enabling financial sustainability and driving wider adoption of their projects.
Aviyel's vision involves the creation of a knowledge-sharing platform that facilitates a seamless and assured exchange of information, support, and content related to open-source projects, connecting the open-source community with businesses and developers who leverage these projects to develop outstanding products. This vision is outlined in the Aviyel Manifesto.
Hacktoberfest Projects: Hacktoberfest Projects is a dedicated platform for discovering eligible projects for Hacktoberfest. While its primary purpose is to assist in locating Hacktoberfest-related projects, there are no restrictions preventing contributions to these projects during months other than October.
Good First Issues: The Good First Issue website carefully compiles issues tagged as 'good first issues' from diverse open-source projects and presents them through an attractive and user-friendly interface. This platform provides an efficient means of discovering such beginner-friendly issues on GitHub, which would otherwise require a substantial amount of time and effort to locate manually. If you're new to open source, I highly recommend visiting and exploring this website for a more streamlined experience.
Clotributor: Clotributor is an open-source platform for finding CNCF open-source projects, It provides a list of issues to grab for various CNCF projects.
Parting Thoughts
If you've made it this far, it's clear that you're genuinely committed to diving into the world of open source. I wholeheartedly wish you the best of luck on your open-source journey. Whether it's now or in the future, please don't hesitate to reach out to me on Twitter(X) or LinkedIn if this blog has played a role in helping you take your first steps in open source. I'd be thrilled to hear about your experiences along the way.
